BMW Motorcycle /2 & /5 Soft Clutch
Installation Instructions


/2 /5 soft clutch 1. Loosen the locknut on the cable adjuster on the clutch lever housing at the handle bar. Screw the adjuster in, until you have a minimum of threads.

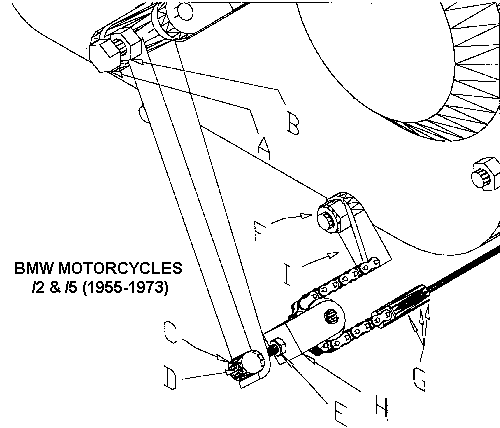
2. Loosen the lock nut (B) on the adjuster bolt of the clutch arm (A) and back the adjuster bolt out three or four turns.

3. Remove the cable from the arm and pull the end of the cable taught, out an angle, toward the right foot peg. Use sharp side cutters (you want to make a clean cut on the cable). For the /5 models, measure from the free end of the cable back approximately 4 inches and cut the cable. For the /2 models, measure from the free end of the cable back approximately 2 7/8 inches and cut the cable. Save the removable cable barrel from the cut-off piece of cable.

Important! Note the orientation of the chain and it’s attached bracket (I) in relation to the pulley block (H) in the two drawings. They are different. You must orient the chain and bracket to the pulley for the application to your machine, be it a /2 & /5 or a /6 & /7. This is easily accomplished by removing the 3 set screws (J) from the cable anchor, (using the supplied allen wrench) and pulling the chain out of the pulley (H). Turn the chain over, and reinsert it through the pulley if necessary.

4. Use the allen wrench, (which is supplied) and loosen the three socket head set screws (G) in the brass terminal end of the easy clutch. Insert the cut end of the cable into the brass end and tighten the three set screws. TIP: Your cable may fit brass terminal tightly. To insure the cable bottoms completely in the brass terminal, twist the terminal in a clockwise direction, while pushing the cable in.

5. Loosen the locknut (E) on the pulley block of the easy clutch. Remove the socket head cap screw (D) and the nut from the pulley block (H). Use the supplied allen wrench to do so. Completely remove the lock nut (E) from the socket head cap screw (D) and slip the socket head cap screw through the cable barrel (C) that you saved. Notice that the hole through the cable barrel has a stepped hole through one side. Be sure and insert the cap screw through the barrel from the side with the large hole, so the head of the cap screw will seat in the recessed hole. Replace the lock nut (E) on the threaded shaft of the cap screw (D) and thread the screw back into the pulley block (H). Take care not to screw it in too far. Do not let the end of the cap screw protrude into the area of the pulley block that the chain moves through. Lock down the nut (E) onto the face of the pulley block.

6. On a /2 or a /5, simply remove the 6mm nut (F), (10 mm wrench) on the lower right corner of the back door of the transmission. Remove and discard the supplied 6mm socket head cap screw (J), and tube spacer (K) from the anchor bracket, and place the anchor bracket(I) on the stud in the approximate position shown in the above /2 & /5 drawing, and replace the nut. Push the clutch lever arm forward and slip the cap screw (D) of the pulley block through the slotted end of the clutch arm. If you cannot pull the arm far enough forward to accomplish this, back off on the adjuster screw of the clutch arm and try again. Be sure that the cable barrel (C) is seated in the curved ends of the clutch arm as illustrated.

7. Move to the left side of the bike and screw in the adjuster screw (A) of the clutch arm with your right hand, while testing the free play in the clutch lever with your left hand. You must have free play of the clutch lever as you would with a stock clutch cable to insure that the throw-out bearing of the clutch is not engaged when the clutch lever is completely released. It is best to have the clutch arm positioned in such a manner that it is close to the cross bar of the frame of the bike to allow the maximum travel of the arm. When you have the free play set, tighten the adjuster screw lock nut (B). Remember that you also have some adjustment at the clutch lever too. You want to watch the pulley to insure that the first 1 - 2 mm of travel of the clutch lever, in your left hand, causes no movement of the clutch arm. Check the alignment of the easy clutch roller chain over the pulley to insure that the chain is running more or less in the center of the roller of the pulley. If it is not, loosen the socket head cap screw (J) and adjust the bracket (I) on the gearbox by swiveling the bracket clockwise or counter clockwise slightly. Tighten the cap screw (J) and check the free play of the lever again. Readjust the clutch arm or lever cable adjuster if required. That's it! Go out and ride! Check our hours of operation for times we can assist you.

Back to Easy Clutch