BMW motorcycle

Installation Instructions Page 2

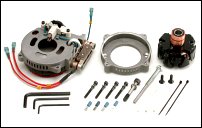
6-volt to 12-volt "Slap-on" Alternator Conversion Kit
12-volt, 200 watt alternator with a built-in voltage regulator and diode board
for BMW motorcycles 1951-1969: BMW R51/3, BMW R67, BMW R68, BMW R50, BMW R50S, BMW R60, BMW R69S, BMW R69
BMW motorcycle parts


BMW motorcycle5. Remove the four 5mm socket head cap screws from the face of the stator with a 4mm allen wrench supplied in the kit. Disassemble the stator housing of the alternator and separate the back housing from the windings. Remove the back cover of the stator. Remove and discard the paper wrapping from the rotor.

Bench Mark Works LLC
Note! There are two different angle tapers of crankshaft noses. Early shafts, (such as the R51/3 or the 1955-1960 twins) have a 17mm shaft diameter. Later crankshafts have a 20mm shaft diameter. The alternator rotors supplied in the kits are available in two versions: one kit for the 20mm shaft and one kit for the 17mm shaft. Compare the diameter of the hole in the back of the generator armature that you removed with the hole in the alternator rotor. It will be readily apparent if the hole in your old generator armature is the same or smaller. If they are the same, you are in business. If the hole is different, STOP immediately and call the vendor you purchased this kit from to trade-in the kit for the proper-sized kit.

BMW motorcycle6. On the inside of the back cover the word “TOP” is stamped. The back cover must be oriented and installed on the face of the timing gear cover with the “top” up on the engine. Use the two countersunk socket head screws and the 4mm allen wrench supplied in the kit to mount the back cover to the face of the timing gear cover. Tighten the countersunk screws. Clean and de-grease the nose of the crankshaft and the side tapered hole of the rotor. Place the rotor on the nose of the crankshaft, install the new socket head cap screw (supplied in the kit) and tighten the cap screw to seat the rotor on the shaft.

antique BMW motorcycle7. Position the face of the stator (with the windings in it) so that the brush assembly is at the top of the alternator. As you install the stator into the back cover, you must push the brushes upward, into their holders, in order to clear the two copper slip rings of the rotor. Be sure the external black case of the windings is squarely seated into the back cover, and that the four holes are lined up, before installing, and tightening, the four socket head cap screws that secure the front half of the stator to the rear cover. Tighten the four socket head cap screws with the 4mm allen wrench.

antique BMW8. The attachment of the original wires is quite straightforward.
A) The blue wire on the alternator is marked with #61. The blue wire from the original harness is connected via the male crimp on connector provided to this wire.

B) The two red wires (or sometimes one red, one black wire) on the alternator are marked #30 and # 51. Both of these wires have a common connection to the alternator. Both the original heavy wires of the original harness attach to these red wires of the alternator. It does not matter which of the wires of the original harness is attached to which of the red wires of the alternator. Use the male crimp on the connectors provided in the kit to attach the original wires.

C) One wire remains, the brown, ground wire. Install the crimp on ring terminal on the end of this brown wire. Temporarily remove one of the socket head cap screws, on the face of the alternator and install the ring terminal of the brown wire under the head of the socket head cap screw. Re-tighten the cap screw.

9. Make sure all of the wires are routed in such a fashion and tied out of the way with the cable ties provided in the kit. You must make sure that the wires are not in a position to be pinched when you replace the generator cover. Make sure that the wires do not interfere with the advance of the magneto. Replace the front engine cover and tighten the bolts.

10. Replace all the 6-volt electrical components with 12-volt components: bulbs, H4 Halogen conversion headlight assembly, bulb holder, and battery. Have the replacement 12-volt battery filled with battery acid, charged and then install the battery. Note: Depending on which 12-volt battery is used, it maybe necessary to flatten the two side tabs on the battery box to prevent interference between the box and the battery. This will be the case if you use a 12N7-4B battery. Be sure the (+) lead of the wiring harness goes to the (+) post of the battery. Failure to correctly attach the battery leads in their proper orientation will damage the electronics of this alternator and void the warranty.

11. Remember, if you have any problems or questions concerning the installation of this alternator, feel free to call Bench Mark Works LLC (662) 465-6444

Back To Page One